
HELPFUL VIDEOS
Watch the following videos anytime to learn more about the steps of your treatment!
1. DIAGNOSING YOUR CASE
-Orthodontic Records (iTero 3D Study Models, Photographs, X-rays)
2. PUTTING ON YOUR BRACES
-Separators, Bands, Brackets, Wires & Elastic Ties (Choose Your Colors!)
3. ORAL HYGIENE WITH BRACES
-Brushing, Flossing, Proxa-brush
4. POKING WIRES + EMERGENCIES
-Wax, Poking Wires + Emergencies
—————————————————————————————————————————————

—————————————————————————————————————————————
ORTHODONTIC RECORDS: Study Models With iTero Scanner, Photographs, X-rays
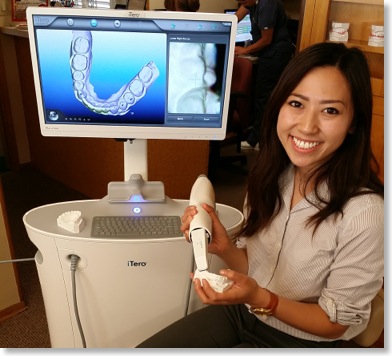
iTero Intra-Oral Scanner: No more gagging on messy putty impressions! Our office is proud to offer our patients the most comfortable state of the art digital impressions instead of traditional alginate impressions. Our patients no longer have to worry about gagging or lip discomfort from being stretched out by intrusive trays. Now all we have to do is take a few pictures with a small intra-oral camera and then a 3d model of your teeth can be seen immediately on the screen! The video below was taken of an actual patient getting a scan done for the first time!
—————————————————————————————————————————————
 —————————————————————————————————————————————
SEPARATORS (AKA "SPACERS")
Separators are small rubber rings that fit between your teeth. They can stretch just like a rubber band and are placed in between a few of your back teeth. These stay in place for a few days to create a small amount of space in between your teeth. When you come back in a few days we will remove the separators and there will be a small space so that we can place a ring around the tooth.
*Please note that not all cases require bands, and if that's the case, then you don't need separators.
—————————————————————————————————
BANDS/RINGS
Have you ever put a ring around your finger? Orthodontic Bands are just like that, except they go around your tooth! Teeth come in different shapes and sizes so we will try on different sized bands to see which one will fit your tooth the best. Once we find the one that fits the best, we will add a small amount of orthodontic adhesive inside the ring and place it down on the tooth and press it into place. We will have you bite down on an instrument called a "bite stick" to make sure it is nice and secure. Then we will remove any extra adhesive from the top of the tooth. The last step is to shine a light on top of the tooth to set the adhesive.
*Please note that not every patient will need bands during treatment, but if you do, they only go on the back teeth like you see in the video.
—————————————————————————————————
BRACKETS
Brackets are bonded with a temporary orthodontic adhesive to the front side of your tooth. During treatment, a wire will connect all the brackets together to help your teeth straighten! A temporary adhesive is used because this allows us to remove your braces at the end of treatment without harming your tooth which is good! However, because it is temporary, then that means you want to be careful about things you eat and do to prevent brackets from breaking during treatment. If brackets break or become loose, then your teeth can move in undesirable ways and delay your treatment from progressing. Contact us immediately so that we can advise you to come in if necessary. We will also give you helpful instructions and tips for how to adjust to your new life with braces!
Putting on the braces is very easy. Here are the steps that you'll see in the video!
1. A plastic cheek retractor is used to help keep the lips and cheeks away from the teeth.
2. Cotton rolls are placed in the mouth to keep the teeth dry.
3. We will first clean the teeth with a special polishing paste to make sure everything is nice and clean before placing the brackets.
4. Then we apply the adhesive in 2 steps. One part goes onto the surface of the tooth. The other part goes onto the backside of the bracket.
5. Then we gently place the bracket on the tooth. This is very light and does not hurt.
6. Once the brackets are in the correct position, then we will shine a special curing light onto the brackets to cause the adhesive to set.
7. Then we remove the cheek retractor and let you rinse out.
—————————————————————————————————
WIRES & ELASTIC TIES - Choose Your Colors!
We start with a very thin, flexible wire to allow the teeth to start moving in the most healthy and comfortable way. The wire is inserted in the middle of the bracket slots to connect all the teeth together. Elastic ties are then placed around the corners of the brackets to hold the wire securely in place. The elastic ties in this video are a green color, but you can choose any color you like. We will see you about once every 4-6 weeks and you can choose a new color at each visit! Keep in mind that elastic ties are changed at each visit because they start to lose elasticity over time and we want to place new ones to ensure the proper tension. Wires however, are only changed to stiffer/thicker ones periodically after the teeth have moved a certain amount.
—————————————————————————————————————————————

—————————————————————————————————————————————
Brushing (above and below the brackets)
Flossing (in between teeth and gums)
Proxabrush (underneath the wire and around brackets)
—————————————————————————————————————————————

—————————————————————————————————————————————
Wax for patient comfort
Poking Wires